Weston study
Wayland是一套display server(Wayland compositor)與client間的通信協議,而 Weston是Wayland compositor的參考實現。 它們定位於在Linux上替換X圖形系統。 X圖形系統經歷了30年左右的發展,其設計在今天看來已略顯陳舊。在X系統中,X Server作為中心服務, 連接clien和硬件以及compositor。但時至今日,原本在X Server中做的事很多已被移到kernel或者單獨的庫中, 因此X Server就顯得比較累贅了。Wayland在架構上去掉了這個中間層, 將compositor作為display server,使client與compositor直接通信,從而在靈活性和性能等方面上能夠比前輩更加出色。
Wayland既可以用於傳統的桌面又適用於移動設備,已經被用於Tizen,Sailfish OS等商業操作系統, 同時越來越多的窗口和圖形系統開始兼容Wayland協議。Wayland基於domain socket實現了一套display server與client間通信的庫 (簡單的基於例子的介紹可以參見http://blog.csdn.net/jinzhuojun/article/details/40264449), 並且以XML形式定義了一套可擴展通信協議。這個協議分為Wayland核心協議和擴展協議(位於Weston中)。 Weston作為Wayland compositor的參考實現,一般和Wayland同步發佈。 其它Wayland compositor實現還有如 (GNOME)mutter, (KDE)Kwin, Lipstick, Enlightenment, Clayland等。
下面分別從幾個方面介紹下Wayland/Weston的實現。
- 架構
- 源碼及模塊結構
- 渲染流水線
- 窗口和輸入管理
架構
Wayland的系統體系架構可以參見官方文檔,不再累述。 Weston從內部體系結構來看,主要分為
- 窗口管理(shell)
- 合成器(compositor)
- 輸入管理幾個部分
從大體的流程上來看,輸入管理模塊接受用戶輸入,然後一方面shell作出相應的窗口管理操作(如窗口堆棧的改變,focus的變化等), 另一方面將該input event傳給之前註冊了相應輸入事件的client。client收到後會在handler中做相應動作, 如調整視圖然後重繪。如有重繪發生,新buffer渲染完成後client將其handle傳給server, 接著server端生成z-order序的窗口列表,之後compositor用renderer進行合成,最後輸出(比如到framebuffer)。
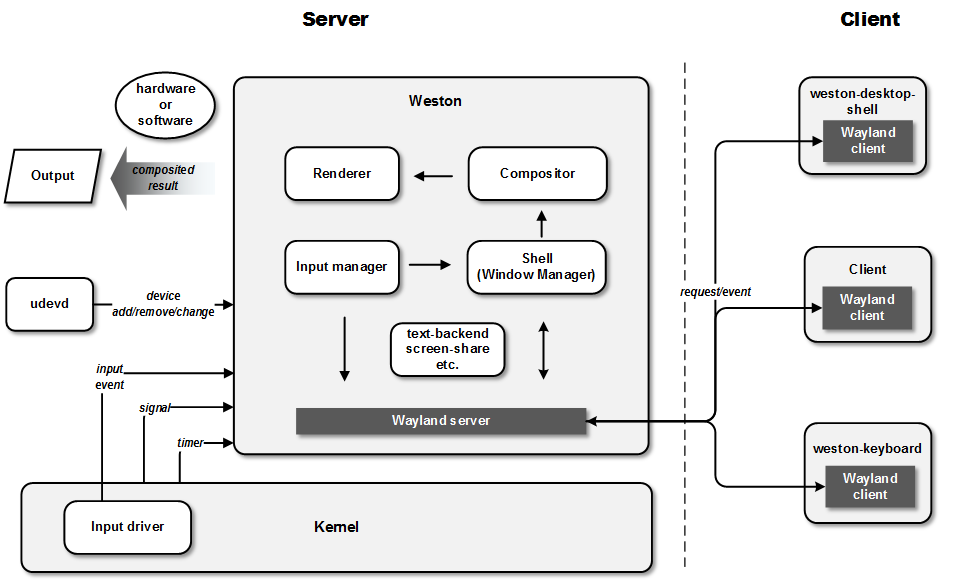
Weston是主要服務進程,它的事件處理模型採用的是典型的Reactor模式。 根據Linux中萬物皆文件的原則,主循環通過epoll機制等待在一系列的文件fd上。 這種模型與基於線程的binder不同,是一種串行的事件處理模型。在此模型上的過程調用在不加額外同步機制的情況下是異步的。 好處是不會有競爭問題,數據同步開銷較小。缺點是當有一個事件處理比較耗時或者在等待IO,則有可能使整個系統性能下降或響應不及時。
主循環上等待的幾個核心fd包括:
- Server/Client通信:listener fd在Weston啟動時建立,並一直監聽新的client連接。一個client連接後會與Weston建立一對domain socket,Wayland就是基於它來通信的。
- 輸入處理:一方面通過udev monitor監聽設備的添加刪除事件。另一方面如有新設備添加時會將該設備打開並監聽該fd來得到輸入事件。
- 其它:監聽如timer(用於如睡眠鎖屏等場景)和signal(如收到SIGINT, SIGTERM, SIGQUIT時退出主循環)等事件。timer和signal可以分別用timerfd和signalfd來用fd來表示。另外還有logind的dbus連接等。
- 除這些外,在event loop中還會維護一個idle list。Weston中需要異步處理的操作可以放在其中。每輪循環都會檢查其中是否有任務,有的話拿出來執行。
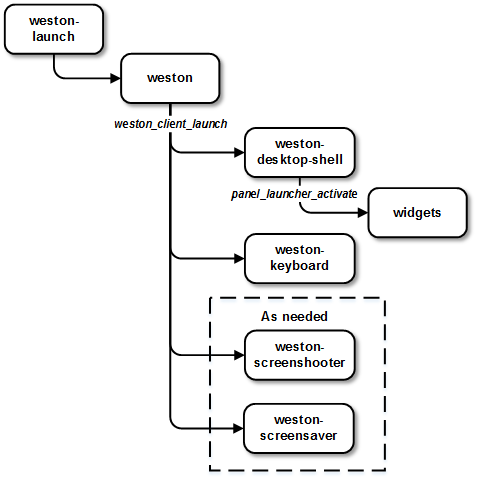
下面看下Weston的運行時進程模型。Weston設計時是可以以一般用戶運行的,但就需要用weston-launch來啟動。
當需要進行一些需要root權限的工作,比如關於DRM, TTY, input device的相關操作,就交由weston-launch去做。
Weston會在啟動時或按需起一些子進程,它們本質上是Weston的client,它們會通過專用的協議做一些系統應用的工作。 如系統應用weston-desktop-shell負責一些系統全局的界面,比如 panel, background, cursor, app launcher, lock screen等。 它不作為Weston服務本身的一部分,而是作為一個client。其作用有點類似於Android中的SystemUI。 這樣便可方便地替換成定製的界面。weston-keyboard是軟鍵盤面板。weston-screenshooter和weston-screensaver分別用於截屏和屏保, 它們都是按需才由Weston啟動的。前者在截屏快捷鍵按下時啟動,後者在需要鎖屏時啟動。
另外,Weston啟動時會讀取weston.ini這個配置文件,其中可以配置桌面,動畫和後端等等信息。
Source code, Module 結構
Wayland的協議定義在protocol目錄,通信協議實現在 src 目錄, 它主要編譯出三個庫
- libwayland-client: client端實現
- libwayland-server: server端實現
- libwayland-cursor: 鼠標相關處理實現
編譯時會首先編譯出wayland-scanner這個可執行文件,它利用expat這個庫來解析xml文件,將wayland.xml生成相應的
wayland-protocol.cwayland-client-protocol.hwayland-server-protocol.h
它們會被Wayland的client和server在編譯時用到。同時wayland-scanner也需要在生成Weston中的Wayland擴展協議中起同樣作用。
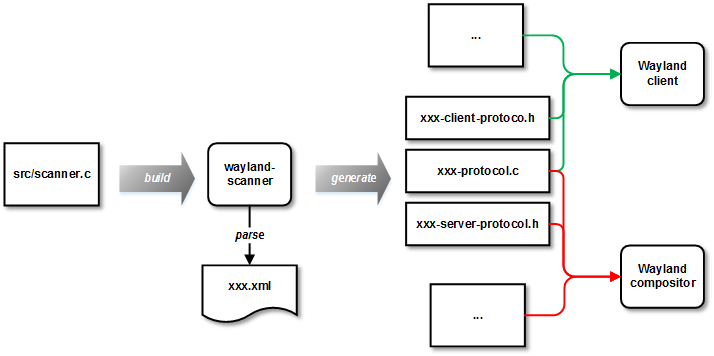
Wayland主要依賴於兩個庫,一個上面提到的expat協議,另一個libffi用於在跨進程過程調用中根據函數描述生成相應calling convention的跳板代碼。
Weston的主要實現在src目錄下。與Wayland類似,protocol目錄下放著Wayland協議定義。 在clients目錄下是一些client的例子,也包括了desktop-shell和keyboard等核心client的例子, 也包含了如simple-egl, simple-shm, simple-touch等針對性的簡單用例。 Weston啟動過程中會分別加載幾個backend:
- shell backend
- render backend
- compositor backend
它們分別用於窗口管理,合成渲染和合成內容輸出。
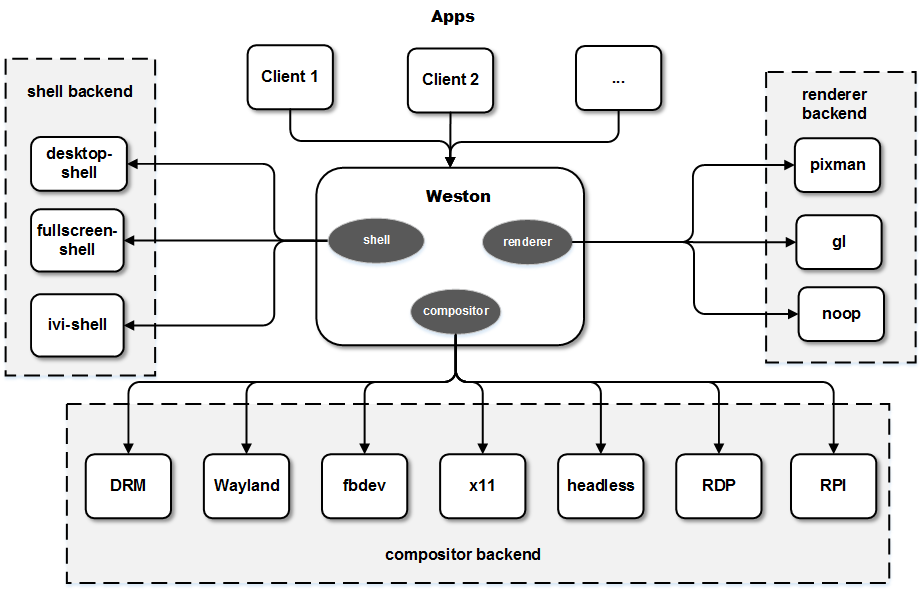
由於這些後端都可有不同的實現,為了邏輯上的獨立性和結構上的靈活性,他們都編譯成動態鏈接庫從而可以在Weston初始化時被加載進來。這種方式在Weston中被廣泛採用,一些功能比如屏幕共享等都是以這種形式加載的。
-
Shell backend用於實現具體的窗口管理。相應的實現分別在desktop-shell,fullscreen-shell和ivi-shell目錄中。
-
Renderer backend主要用於compositor的合成之用,除去noop-renderer外,有
- gl-renderer: 為GPU硬件
- pixman-renderer: 為軟件渲染
-
Compositor backend 舉例來說,compositor backend主要決定了compositor合成完後的結果怎麼處置。 從數據結構上,weston_output是output設備的抽象,而下面的backend會實現具體的output設備。
- fbdev:直接輸出至linux的framebuffer設備。接口通用。
- headless:和noop-renderer配合使用,可以在沒有窗口系統的機子(比如server上)測試邏輯。
- RPI:用於Raspberry Pi平台。
- RDP:合成後通過RDP傳輸到RDP peer顯示,用於遠程桌面。
- DRM:Direct redering manager,桌面上一般用這個。
- x11:Wayland compositor作為X server的client。它可以讓Wayland client運行在X11上。
- wayland:Wayland composiotr作為server同時,也作為另一個Wayland compositor的client。用於nested compositor。
渲染流水線
一個Wayland client要將內存渲染到屏幕上,首先要申請一個graphic buffer(GEM), 繪製完後傳給Wayland compositor並通知其重繪。Wayland compositor收集所有Wayland client的請求, 然後以一定週期把所有提交的graphic buffer進行合成。合成完後進行輸出。
本質上,client需要將窗口內容繪製到一個和compositor共享的buffer上。這個buffer可以是普通共享內存, 也可以是DRM中的GBM或是gralloc提供的可供硬件(如GPU)操作的graphic buffer。在大多數移動平台上,沒有專門的顯存, 因此它們最終都來自系統內存,區別在於圖形加速硬件一般會要求物理連續且符合對齊要求的內存。
如果是普通共享內存,一般是物理不連續的,多數情況用於軟件渲染。有些圖形驅動也支持用物理不連續內存做硬件加速, 但效率相對會低一些。根據buffer類型的不同,client可以選擇自己繪製,或是通過Cairo,OpenGL繪製,或是更高層的如Qt,GTK+這些widget庫等繪製。
繪製完後client將buffer的handle傳給server,以及需要重繪的區域。在server端,compositor將該buffer轉為紋理 (如果是共享內存使用glTexImage2D上傳紋理,硬件加速buffer用GL_OES_EGL_image_external擴展生成外部紋理)。 最後將其與其它的窗口內容進行合成。下面是抽象的流程圖。

注意Wayland設計中默認buffer是從client端分配的。這和Android中在server端分配buffer的策略是不同的。 這樣,client可以自行設計buffer的管理策略。理論上,client可以始終只用一塊buffer, 但因為這塊buffer在client和server同時訪問會產生競爭,所以一般client端都會實現buffer queue。 流水線上比較關鍵的一環是buffer跨進程的傳輸,也就是client和server間的有效傳遞。 buffer當然不可能通過拷貝傳輸,因此這裡只會傳handle,本質上是傳buffer的fd。我們知道fd是per-process的。 而可以傳遞fd的主要IPC機制有binder, domain socket和pipe等。Wayland底層用的是domain socket,因此可以用於傳fd。
在這條流水線上,可以看到,client和server端都會發生繪製。
- client繪製本地的窗口內容
- server端主要用於合成時渲染(compositor)
注意兩邊都可獨立選擇用軟件或者硬件渲染。現在的商用設備上,多是硬件加速渲染。和Android上的SurfaceFlinger和Ubuntu上的Mir一樣, Wayland同樣基於EGL接口。EGL用於將本地窗口系統與OpenGL關聯起來,與WGL, GLX等作用類似, 只是它是用於Embedded platform的。在Wayland/Weston系統中,Wayland定義了用於EGL的窗口抽象, 來作為EGL stack(也就是廠商的圖形驅動)和Wayland協議的glue layer。它對EGL進行了擴展, 增加了比如eglBindWaylandDisplayWL, eglUnbindWaylandDisplayWL, eglQueryWaylandBufferWL等接口, 對Wayland友好的EGL庫應該提供它們的實現,也就是說要提供Wayland EGL platform,比如mesa(src/egl/main/eglapi.c中)。 另一種做法是像libhybris中eglplatform一樣通過EGL wrapper的方式加上這些支持(hybris/egl/platforms/common/eglplatformcommon.cpp)。 同時,EGL stack需要提供廠商相關的協議擴展使client能與compositor共享buffer。 wayland-egl庫提供了Wayland中surface和EGL粘合的作用。一個要用硬件加速的EGL window可以基於Wayland的surface創建, 即通過wayland-egl提供的接口創建wl_egl_window。wl_egl_window結構中包含了wl_surface, 然後wl_egl_window就可以被傳入EGL的eglCreateWindowSurface()接口。這樣就將Wayland surface與EGL stack聯繫在一起了
窗口管理 Shell
前面提到,buffer需要有surface為載體,這個surface可以理解為一個窗口的繪製表面。 如果一個Wayland client的窗口要被窗口管理器(Shell)所管理,則需要為這個surface創建相應的shell surface。 理一下這裡相關的幾個核心概念:surface,view,shell surface。首先,surface是Weston中的核心數據結構之一。 Surface代表Wayland client的一個繪圖表面。Client通過將畫好的buffer attach到surface上來更新窗口, 因此說surface是buffer的載體。在Weston中,shell是窗口管理器,因此一個surface要想被窗口管理器管理, 需要創建相應的shell surface。同時shell surface對應的其實是surface的一個view。view是surface的一個視圖。 換句話說,同一個surface理論上可以有多個view,因此weston_surface結構中有view的列表。這裡和我們邏輯上的窗口的概念最近似的是view, 因為它對應用戶所看到的一個窗口。而當surface與view是1:1關係時(絕大多數情況下),surface也可近似等同於窗口。 在server端它們的數據結構是相互關聯的。
How to build weston
mkdir -p ~/Wayland

WHOME="~/Wayland"

export WLD=$WHOME/install   # change this to another location if you prefer
export LD_LIBRARY_PATH=$WLD/lib:$WLD/lib/x86_64-linux-gnu/
export PKG_CONFIG_PATH=$WLD/lib/pkgconfig/:$WLD/share/pkgconfig/
export PATH=$WLD/bin:$PATH
export ACLOCAL_PATH=$WLD/share/aclocal
export ACLOCAL="aclocal -I $ACLOCAL_PATH"

mkdir -p $WLD/share/aclocal # needed by autotools
├── bin
├── include
├── lib
├── libexec
└── share
Install
$ pip3 install --user meson
To install system wide, you’ll need to set WLD differently, add some switches to every autogen.sh invocation, and use sudo to make install. Choose the libdir as appropriate for your distribution and architecture (it may be /usr/lib32 or /usr/lib64).
$ git clone https://gitlab.freedesktop.org/wayland/weston.git
$ cd weston
$ meson build/ --prefix=$WLD
$ ninja -C build/ install
$ cd ..
The meson command populates the build directory. This step can fail due to missing dependencies. Any build options you want can be added on that line, e.g. meson build/ –prefix=$WLD -Dsimple-dmabuf-drm=intel. All the build options can be found in the file meson_options.txt.
Once the build directory has been successfully populated, you can inspect the configuration with meson configure build/. If you need to change an option, you can do e.g. meson configure build/ -Dsimple-dmabuf-drm=intel.
Run
if test -z "${XDG_RUNTIME_DIR}"; then
    export XDG_RUNTIME_DIR=/tmp/${UID}-runtime-dir
    if ! test -d "${XDG_RUNTIME_DIR}"; then
        mkdir "${XDG_RUNTIME_DIR}"
        chmod 0700 "${XDG_RUNTIME_DIR}"
    fi
fi

mkdir -p ~/.config
cp weston/weston.ini ~/.config
it will run on the KMS/DRM framebuffer and take input from evdev devices. Use weston-launch, which as a setuid-root program does privileged operations on Weston’s behalf. It also requires that you either enable systemd session support for weston-launch (by using systemd and having the systemd-login devel headers at configure time), or add yourself to the “weston-launch” group:
$ sudo groupadd weston-launch
$ sudo usermod -a -G weston-launch $USER
$ # Log all the way out (of X, etc.)
$ sudo chown root $WLD/bin/weston-launch
$ sudo chmod +s $WLD/bin/weston-launch
$ weston-launch
sample client
- ‘weston-terminal’ is a simple terminal emulator, not very compliant at all, but works well enough for bash
- ‘weston-flower’ draws a flower on the screen, testing the frame protocol
- ‘weston-gears’ glxgears, but for wayland
- ‘weston-smoke’ tests SHM buffer sharing
- ‘weston-image’ loads the image files passed on the command line and shows them
- ‘weston-view’ does the same for pdf files
- ‘weston-resizor’ demonstrates smooth window resizing (use up and down keys)
- ‘weston-eventdemo’ reports libtoytoolkit’s events to console (see weston-eventdemo –help)
Optional environment variables which will get you more debugging output:
export MESA_DEBUG=1
export EGL_LOG_LEVEL=debug
export LIBGL_DEBUG=verbose
export WAYLAND_DEBUG=1
1 Wayland logs↑ To get the logs of the wayland protocol messages, set this environment variable:
Board $> export WAYLAND_DEBUG=1 2 Saving Weston logs in a file↑ Standard Weston logs are available in the /var/log/weston.log file when Weston is started using the systemd service.
Board $> cat /var/log/weston.log 3 Displaying Weston logs on a console↑ Start Weston with the following command:
Board $> weston –tty=1 & All Weston logs are then displayed on the console.
Refer
Backend
移到 primary plane 也會遇到 ref_buf 找不到問題, 不過在 primary plane 能夠正常畫出
目前目標釐清
- view move 到 sprite plane 就畫不出 why
- primary plane 如何 create
目前朝 output(CRTC 裝置) 如何 init, repaint 去看
- drm_output_create
- drm_output_init_egl
repaint
- output->base.start_repaint_loop = drm_output_start_repaint_loop;
- output->base.repaint = drm_output_repaint;
- output->base.assign_planes = drm_assign_planes;
drm_backend_create
-
create_sprites
-
drm_output_create
-
drm_repaint_begin
output->drm_assign_planes output->drm_output_repaint -
drm_repaint_flush
output(CRTC device)
-
drm_output_attach_head
-
drm_output_enable drm_output_enable drm_output_print_modes
-
drm_output_start_repaint_loop
-
drm_assign_planes drm_output_propose_state
-
drm_output_repaint